Definition of a fiber bundle
A fiber bundle in Phantomas is defined as a cylindrical tube wrapped around its centerline. The centerline itself is a continuous curve in 3D, and can be simply created from a few control points. In this tutorial, we will show on a simple example how to define a fiber bundle.

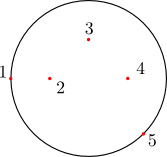
We first define a series of control points, through which the bundle centerline will pass. Note that the first and the last control points should lie on the “cortical surface”. Here (and in the current release of Phantomas), the cortical surface is a sphere. The radius of the sphere in the present example is 10mm.
Note that in the example shown here, the points are in the  plane,
while in general points are defined by their 3D Cartesian coordinates.
Control points can be defined in a JSON file. For instance, the example illustrated here would look like:
{
  'fiber_geometries' : {
    'planar_fiber': {
      'control_points':
        [-10.0 ,  0.0 , 0.0,
          -5.0 ,  0.0 , 0.0,
           0.0 ,  5.0 , 0.0,
           5.  ,  0.0 , 0.0,
           7.07, -7.07, 0.0],
      'tangents': 'symmetric',
      'radius': 2.0
    },
  },
}

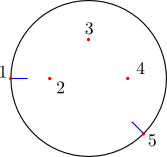
The tangent to the centerline at the cortical surface will necessarily be normal to the surface. This is automatically done by Phantomas.

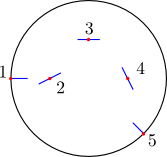
Phantomas will also compute the tangents to the fiber bundle centerline for each control points provided. There are three modes to define these tangents; we recommend the use of the default mode, "symmetric".

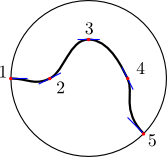
Finally, the fiber centerline is constructed using piecewise polynomials.
